APIs are now the standard for building and integrating modern applications. It also evolved as the key enabler in conducting risk-free legacy modernization and they become engines of innovation. In addition, exposing the services via APIs allows organizations to reach a larger audience, expand into new areas, and reuse existing assets. Providing security to these APIs is one of the main concerns. In this post, we will talk about using Token Based Authentication in Dotnet Core.
Okay, some may ask – Explain this in simple terms
In Basic Authentication, an HTTP user agent must provide the username and password to get through the authentication process. Obviously, The API is responsible for the authentication by validating the credentials against a list/table.
Token-based authentication is stateless. The token is used to send information that can be confirmed and trusted by means of a digital signature. Furthermore, it is a decoupled authentication mechanism, and the API doesn’t manage any user-related data. The following are the steps in the authentication flow.
- First, User sends a request with Credentials
- Token service validates the credentials and provides a signed token
- The User sends this token with each request to access resources
- Finally, API verifies the token and respond
- Token has an expiration time
- Token generation is decoupled
JSON Web Token (JWT)
JSON Web Token (JWT) is an open standard (RFC 7519) that defines a compact and self-contained way for securely transmitting information between parties as a JSON object. We use JWT to pass digitally signed tokens. JWT is widely used also because of its compact size.
A typical JWT token consists of three parts. They are header, payload, and signature. The token is basically a Base-64 encoded text of these three parts delimited by a period(.) symbol. The following is a sample response from a Token service.
{
    "token": "eyJhbGciOiJodHRwOi8vd3d3LnczLm9yZy8yMDAxLzA0L3htbGRzaWctbW9yZSNobWFjLXNoYTI1NiIsInR5cCI6IkpXVCJ9.eyJzdWIiOiJ0dXNlciIsImp0aSI6ImQ5NDU1ZDU4LTg0Y2UtNDc4My05NWI2LWRiM2MxZGFkZmM2YSIsImV4cCI6MTU3MzY3MjUwNywiaXNzIjoiYmxvZ29mcGkuY29tIiwiYXVkIjoiYmxvZ29mcGkuY29tIn0.Qqi7L5B1v0LsQ0xr5zq9uP0a3KaHT_1LvPEXTIarqBE",
    "expiration": "2019-11-13T19:15:07Z"
}
Prerequisites
- Visual Studio 2019
- .NET Core 3.0
Get Started
Create a new Web API Project. I have stored the user data in the database and use Entity Framework to access the data for authentication. Please refer to my post on Entity Framework Core for more details on setting up EF Core in a Web API Project.
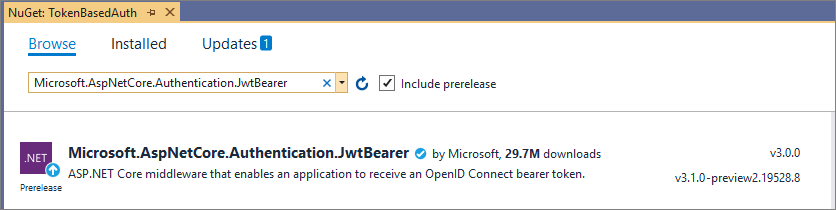
Install the following Nuget package that helps us to create an ASP.NET Core middleware to receive an OpenID Connect bearer token.
We will talk about the following in the subsequent steps.
- Setup Authentication
- Token Service
- Authentication in Controller
- Testing the Implementation
Setup Authentication
To set up authentication, modify the ConfigureServices method in startup like below
public void ConfigureServices(IServiceCollection services)
{
    services.AddDbContext<ApplicationDbContext>(options =>
                options.UseSqlServer(Configuration.GetConnectionString("DefaultConnection")));

    services.AddTransient<IUserService, UserService>();
    services.Configure<AuthOptions>(Configuration.GetSection("AuthOptions"));

    var authOptions = Configuration.GetSection("AuthOptions").Get<AuthOptions>();

    services.AddAuthentication(options =>
    {
        options.DefaultAuthenticateScheme = JwtBearerDefaults.AuthenticationScheme;
        options.DefaultChallengeScheme = JwtBearerDefaults.AuthenticationScheme;
            }).AddJwtBearer(options =>
     {
         options.TokenValidationParameters = new TokenValidationParameters
         {
             ValidateIssuer = true,
             ValidateAudience = true,
             ValidateLifetime = true,
             RequireExpirationTime = true,
             ValidIssuer = authOptions.Issuer,
             ValidAudience = authOptions.Audience,
             IssuerSigningKey = new SymmetricSecurityKey(Encoding.UTF8.GetBytes(authOptions.SecureKey))
         };
     });

    services.AddControllers();
}
Also, the default authentication scheme should be set by passing JwtBearerDefaults.AuthenticationScheme to the AddAuthentication method. We provide the issuer, audience along with other key values from the appsettings.json.
Once we configure the services, we have to add the middleware to the pipeline. This can be done in the Configure method.
public void Configure(IApplicationBuilder app, IWebHostEnvironment env)
{
    // Code omitted for brevity

    app.UseAuthentication();
    app.UseAuthorization();

    // Code omitted for brevity
}
Token Service
In the previous step, we configured the services and added the middleware to the pipeline. Now we have to create the service which authenticates the user and issue a token.
Obviously, the token service will need to connect with a repository to validate the user. I have created a separate service (UserService) to do the authentication by connecting to a database. We will inject the instance of this service into the Token service.
Also, I have created an API Controller that receives the credentials, verify and responds with a token. The controller receives a model (UserModel) that has the user name and password as properties.
public class UserModel
{
    [Required(ErrorMessage = "Username is required")]
    public string Username { get; set; }

    [Required(ErrorMessage = "Password is required")]
    public string Password { get; set; }
}
The authentication mechanism I used here is simple. I just check if there is a record available in the database for the given user name and password. It doesn’t encrypt or hash the credentials. You can tweak this based on your requirements.
namespace TokenBasedAuth.Services
{
    public interface IUserService
    {
        bool IsValidUser(UserModel user);
    }
    public class UserService : IUserService
    {
        private readonly ApplicationDbContext _context;
        public UserService(ApplicationDbContext context)
        {
            _context = context;
        }
        public bool IsValidUser(UserModel user)
        {
            return _context.Users.Any(x => x.Username.ToLower().Equals(user.Username.ToLower()) && x.Password.Equals(user.Password));
        }
    }
}
Once the credentials are verified by the UserService, we create a token and send it back to the requestor.
Authentication in Controller
To enable authentication in a controller, just add the Authorize attribute in the controller level or the action result level based on the requirement.
[Authorize]
[ApiController]
[Route("[controller]")]
public class WeatherForecastController : ControllerBase
{
}
Testing the Implementation
Okay, we have implemented the token-based authentication in a Web API application. Now, we have to test the API and make sure it is working as expected. How to do that?
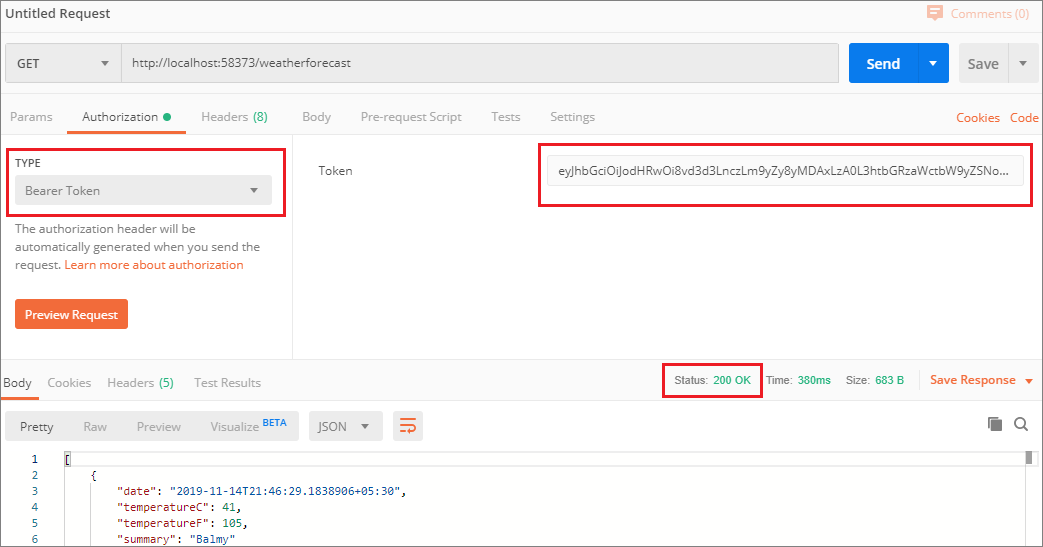
Let’s use the Postman tool to access the controller where we have enabled the authentication with Authorize attribute. I start the testing by accessing the API without any token. I just want to make sure the authentication fails and returns a 401 error.
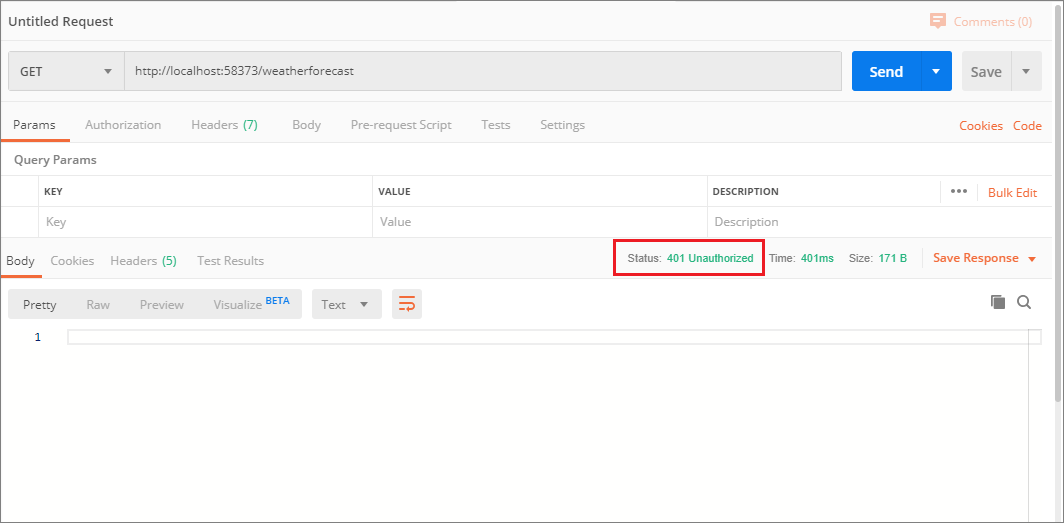
The test failed as expected because we didn’t pass any token along with the request. Let’s create the token by passing the credentials to the Token service.
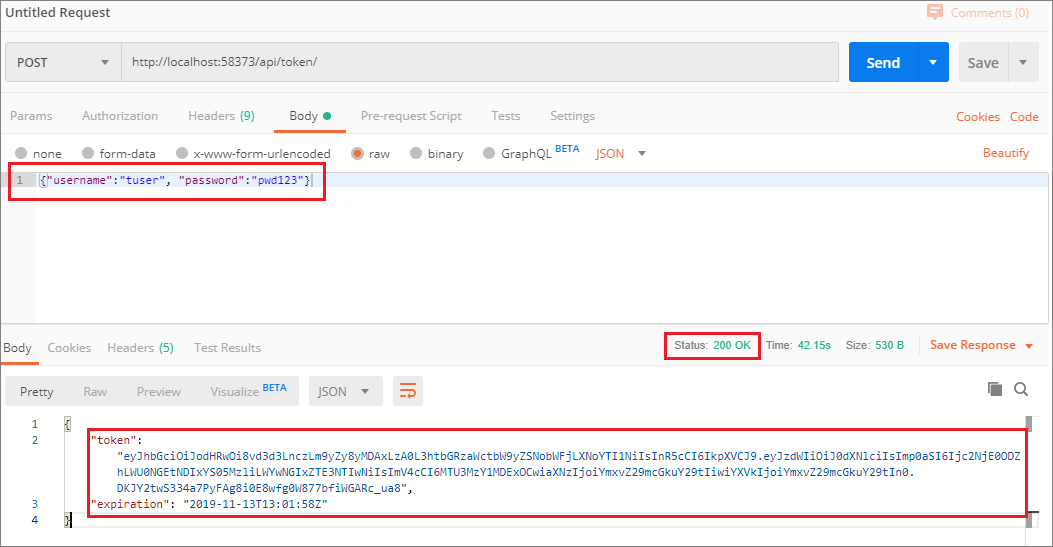
Now we have to pass the token. First, go to the Authorization tab in Postman and select Bearer as type. Next, copy the token text in the textbox before sending the request.
Summary
Token-based authentication helps us to build services that are decoupled from the authentication mechanism. In this post, you learned how to implement Token-based authentication in ASP.NET Web API with .NET Core 3.0.
The full implementation of this post can be found in Github
Further reading
The following are some of the links you can refer to if you want to learn more about Token-based authentication.

A great article. Thanks for clear and simple explanation.