Most of the people using Entity Framework are familiar with the approach of generating database through code. This method is popularly known as “Code First” approach. “Code First” workflow begins with classes that describe the conceptual model. In addition, Code first approach offers more control over the final appearance of the application code and the resulting database. By the way we will talk about Code First Entity Framework Core using SQL Server in this blog post. In summary, following are the few advantages of this approach.
The sample code used in this post is available in github
Advantages:
- Database Version Control
- Versioning databases is hard. However with code first approach, it’s much more effective
- Because the database schema is fully based on code models, by version controlling source code you’re helping to version your database
- Speed up Development
- No dependency between developers
- Easy to on-board new developer
- Each developer will have their own Database
- Much easier and quicker to add a property to a class in the code compare to add a column to a table
- Full control over database design without much knowledge of SQL and DBA
- Out of the box support from Visual Studio and TFS/VSTS to merge code with other developers
- More support for DevOps
- Doesn’t require a separate resource to manage DB
- Easy to generate Create, Update and Delete scripts
- More support for test data and Unit testing
While we talk about the advantages of Code First approach, there are few disadvantages as well. This approach requires everything related to database has to be done through coding. Also, if there are any changes in Database directly, those changes will be overwritten on subsequent migrations or end up with a conflict.
Getting Started
We will talk about the following steps in the remaining article.
- NuGet Packages required for EF Core
- Creating DbContext and Model
- Configure DbContext in Startup.cs
- Setting up Connection string in appsettings.json
- Create Migration and Update database
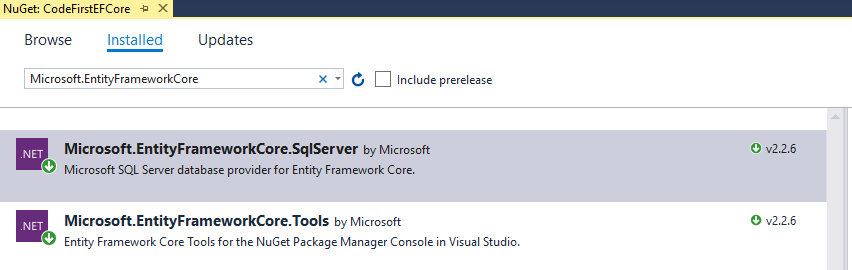
1. NuGet Packages
For the purpose of this blog, i have created an ASP.NET Web API Core project using VS 2017 and the framework used is .NET Core 2.2. First, install the provider package for SQL Server which is “Microsoft.EntityFrameworkCore.SqlServer“. We also have to install “Microsoft.EntityFrameworkCore.Tools” to execute EF Core commands.
2. Create the Model and DbContext
I have created a simple model called “Employee” which will be generated as a table later when we run the EF Core commands.
Employee.cs
using System.ComponentModel.DataAnnotations;
using System.ComponentModel.DataAnnotations.Schema;

namespace CodeFirstEFCore.Models
{
    public class Employee
    {
        [Key]
        [DatabaseGenerated(DatabaseGeneratedOption.Identity)]
        public int Id { get; set; }
        public string FirstName { get; set; }
        public string LastName { get; set; }
        public int Age { get; set; }
        public string Title { get; set; }
    }
}
IMyDbContext.cs
using Microsoft.EntityFrameworkCore;

namespace CodeFirstEFCore.Models
{
    public interface IMyDbContext
    {
        DbSet<Employee> Employees { get; set; }
    }
    public class MyDbContext : DbContext, IMyDbContext
    {
        public MyDbContext(DbContextOptions<MyDbContext> options) : base(options)
        {
        }
        public DbSet<Employee> Employees { get; set; }
    }
}
3. Configure DbContext in Startup.cs
public void ConfigureServices(IServiceCollection services)
{
    services.AddDbContext<MyDbContext>(options =>
        options.UseSqlServer(Configuration.GetConnectionString("DefaultConnection")));

    services.AddMvc().SetCompatibilityVersion(CompatibilityVersion.Version_2_2);
}
4. Setting up Connection string in appsettings.json
I used SQL Express for this demo. You can replace the connection string to work with SQL Authentication. The approach we are using here helps the developer to enable migrations without hardcoding connection string. Alternatively, we can use an environment-specific appsettings.json file in this case.
{
  "ConnectionStrings": {
    "DefaultConnection": "Server=(localdb)\\mssqllocaldb;Database=CodeFirstEFCore;Trusted_Connection=True;MultipleActiveResultSets=true"
  },
  "Logging": {
    "LogLevel": {
      "Default": "Warning"
    }
  },
  "AllowedHosts": "*"
}
5. Create Migration and Update database
After the steps 1 through 4 are completed, we can create the migration.
To add the initial migration, run the following command

Finally, apply the migration to the database and create the schema

Please refer this link for more information on EF commands
Recommended Courses
-
The Complete ASP.Net Core MVC With Entity Framework Core
-
Beyond Basics: RESTful API with ASP.NET Core 3.0 and EF Core
We may receive a commission for purchases made through these links.
Further Reading
Following are some of the links you can refer, if you want to learn more about Entity Framework Core


Pingback: Code First Entity Framework Core - Blog of Pi - How to Code .NET
Pingback: Code First Entity Framework with Dotnet Core - How to Code .NET
Finnaly tuto that works