
In my last post (Get Started with Blazor), we discussed the Blazor Framework, Hosting models and how to set up authentication and authorization in a Blazor server-side application with an example. In this post, I am going to explain CRUD using Blazor and Entity Framework Core. I will use the sample application we have created in the previous post and extend it with the new functionalities we are going to talk about in this post. You will be familiar with the following topics after you read this post.
- Entity Framework Core – Setup in Blazor application
- Using Bootstrap Modals
- Child Components
- Validation
- JavaScript Interop
- Communication Between Components
- Templated Components using Render Fragments (Dynamic Content)
Okay, Let’s get started.
Prerequisites
- Visual Studio 2019
- Install .NET Core 3.0
- Install Blazor Templates
Entity Framework Core – Setup
To begin with, make sure you have the following NuGet packages installed in your project.

For the purpose of this post, I create a model called ToDo.cs and we will use this model for CRUD operations.
// ToDo.cs

public class ToDo
{
    [Key]
    public int Id { get; set; }

    [Required]
    public string Name { get; set; }

    [Required]
    public string Status { get; set; }

    [Required]
    public DateTime DueDate { get; set; }
}
Add the entity in the ApplicationDbContext.cs
// ApplicationDbContext.cs
public class ApplicationDbContext : IdentityDbContext
{
public ApplicationDbContext(DbContextOptions<ApplicationDbContext> options)
: base(options)
{
}
public DbSet<ToDo> ToDoList { get; set; }
public override int SaveChanges()
{
return base.SaveChanges();
}
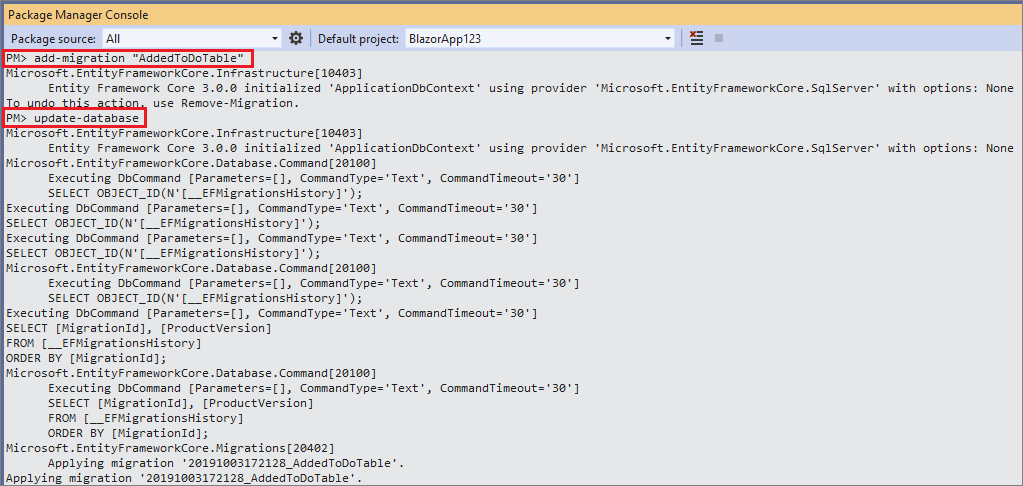
}Now we have added the entity and made required changes in dbcontext. Add the migration and create the table in the database through the package manager console.
Data access service
We have created the table in the database. Create a service to access the table and perform CRUD operations. This service implements from an interface and the interface is configured in the startup for dependency injection.
// ToDoListService.cs

using Microsoft.EntityFrameworkCore;
using System.Collections.Generic;
using System.Threading.Tasks;
using BlazorApp.Data;

namespace BlazorApp.Services
{
    public interface IToDoListService
    {
        Task<List<ToDo>> Get();
        Task<ToDo> Get(int id);
        Task<ToDo> Add(ToDo toDo);
        Task<ToDo> Update(ToDo toDo);
        Task<ToDo> Delete(int id);
    }
    public class ToDoListService : IToDoListService
    {
        private readonly ApplicationDbContext _context;

        public ToDoListService(ApplicationDbContext context)
        {
            _context = context;
        }
        public async Task<List<ToDo>> Get()
        {
            return await _context.ToDoList.ToListAsync();
        }

        public async Task<ToDo> Get(int id)
        {
            var toDo = await _context.ToDoList.FindAsync(id);
            return toDo;
        }

        public async Task<ToDo> Add(ToDo toDo)
        {
            _context.ToDoList.Add(toDo);
            await _context.SaveChangesAsync();
            return toDo;
        }

        public async Task<ToDo> Update(ToDo toDo)
        {
            _context.Entry(toDo).State = EntityState.Modified;
            await _context.SaveChangesAsync();
            return toDo;
        }

        public async Task<ToDo> Delete(int id)
        {
            var toDo = await _context.ToDoList.FindAsync(id);
            _context.ToDoList.Remove(toDo);
            await _context.SaveChangesAsync();
            return toDo;
        }
    }
}
Okay, the data access part is now completed. Make sure, you have added the following code at the end of ConfigureServices method in startup.cs. This is to inject ToDoListService.
// Startup.cs

services.AddTransient<IToDoListService, ToDoListService>();
Details Page
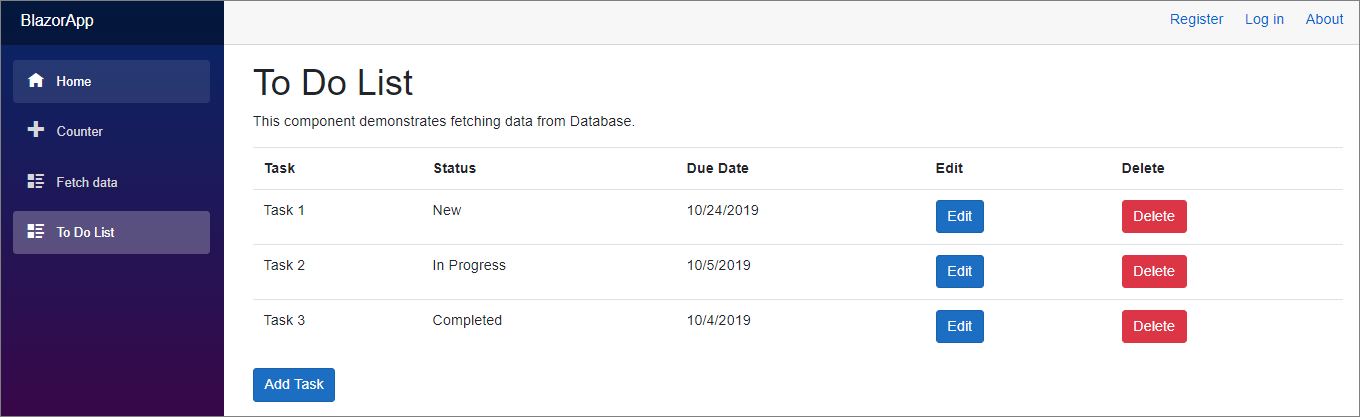
Let’s create a page to list the records from the database. I have copied the default FetchData.razor and made changes to show the sample records populated in the To-Do List table from the database. NavMenu.razor has been changed to show the “To-Do List” link.
// ToDoList.razor

@page "/todolist"

@using BlazorApp.Data
@using BlazorApp.Services
@inject IToDoListService service

<h1>To Do List</h1>

<p>This component demonstrates fetching data from Database.</p>

@if (toDoList == null)
{
    <p><em>Loading...</em></p>
}
else
{
    <table class="table">
        <thead>
            <tr>
                <th>Task</th>
                <th>Status</th>
                <th>Due Date</th>
                <th>Edit</th>
                <th>Delete</th>
            </tr>
        </thead>
        <tbody>
            @foreach (var toDoItem in toDoList)
            {
                <tr>
                    <td>@toDoItem.Name</td>
                    <td>@toDoItem.Status</td>
                    <td>@toDoItem.DueDate.ToShortDateString()</td>
                    <td><input type="button" class="btn btn-primary" value="Edit" /></td>
                    <td><input type="button" class="btn btn-danger" value="Delete" /></td>
                </tr>
            }
        </tbody>
    </table>
}
<div>
    <input type="button" data-toggle="modal" data-target="#taskModal" class="btn btn-primary" value="Add Task" />
</div>


@code {
        List<ToDo> toDoList;

    protected override async Task OnInitializedAsync()
    {
        toDoList = await service.Get();
    }
}
This code is very similar to FetchData.razor except this is fetching data from the database using Entity Framework Core. The service IToDoListService is injected at the top.
Now we have to call the service to fetch the data. The right place to make a service call is inside OnInitializedAsync. It is one of the Blazor Lifecycle methods. It is executed when the component is completely loaded. You can use this method to load data by calling services because the control rendering will happen after this method. I have also added the code to display buttons for CRUD operations but not wired with any code as of now. When you run the application, you will see a page similar to this.
Add Bootstrap
To use bootstrap modal dialog, I have added jQuery and Bootstrap libraries using “Add Client-side Library”. You can find the option by right-clicking your project then Add -> Client-side Library
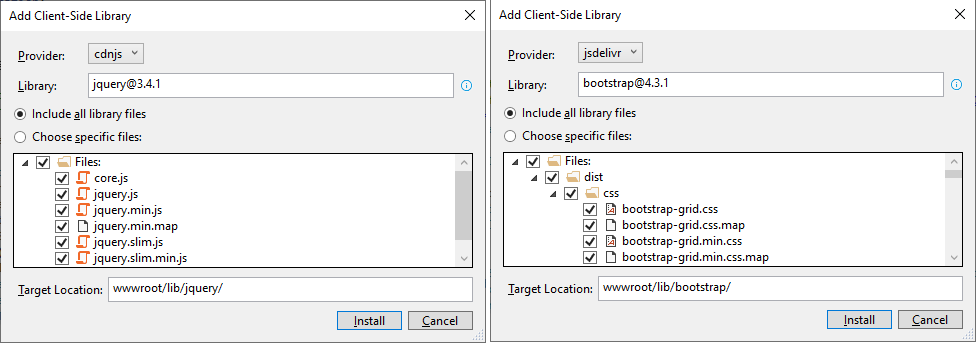
Include the following lines inside the body of _Host.cshtml
// _Host.cshtml

<script src="~/lib/jquery/jquery.min.js"></script>
<script src="~/lib/bootstrap/dist/js/bootstrap.min.js"></script>
Child Components
Before we proceed with the CRUD implementations, we need to know about child components. Blazor apps are based on components. Components are reusable building blocks, it can be an individual control or a block with multiple controls. These component classes are written in razor markup.
Components can include other components. You can add a component inside others using the component name in an HTML syntax. We will use this concept to create bootstrap modals as child components for Add/Edit and Confirmation dialogs.
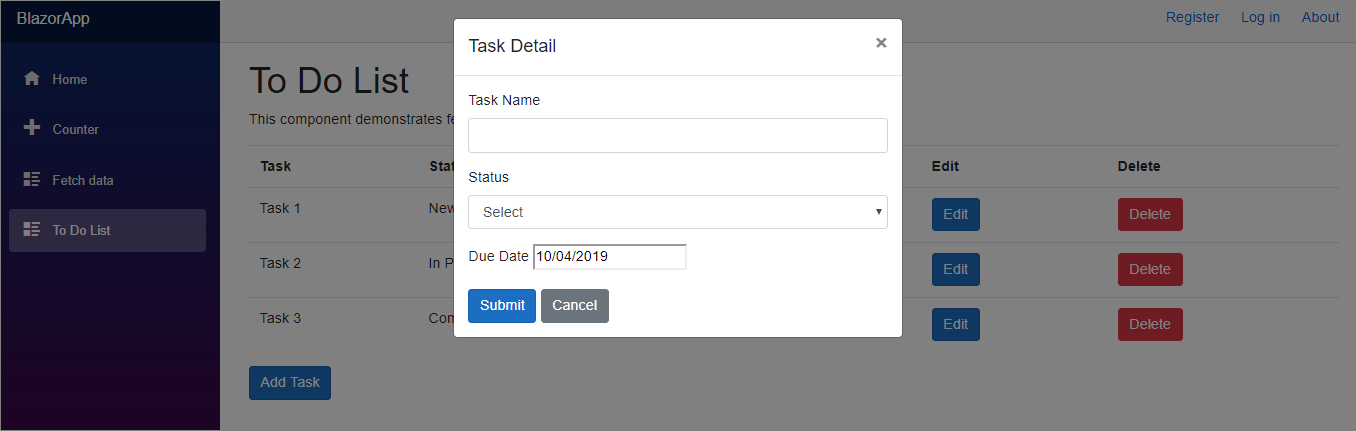
Add Task
The next step is to create a razor component to accept the input from the user for a new To-Do item. I have created a razor component named TaskDetail.razor.
// TaskDetail.razor

@using BlazorAppp.Data
@using BlazorAppp.Services
@inject IToDoListService service

<div class="modal" tabindex="-1" role="dialog" id="taskModal">
    <div class="modal-dialog" role="document">
        <div class="modal-content">
            <div class="modal-header">
                <h5 class="modal-title">Task Detail</h5>
                <button type="button" class="close" data-dismiss="modal" aria-label="Close">
                    <span aria-hidden="true">×</span>
                </button>
            </div>
            <div class="modal-body">
                <EditForm Model="@TaskObject" OnValidSubmit="@HandleValidSubmit">
                    <div class="form-group">
                        <label for="taskName">Task Name</label>
                        <input type="hidden" @bind-value="@TaskObject.Id" />
                        <InputText id="name" class="form-control" @bind-Value="@TaskObject.Name" />
                    </div>
                    <div class="form-group">
                        <label for="status">Status</label>
                        <InputSelect id="Summary" class="form-control"
                                     @bind-Value="TaskObject.Status">
                            <option value="">Select</option>
                            @foreach (var status in TaskStatusList)
                            {
                                <option value="@status">
                                    @status
                                </option>
                            }
                        </InputSelect>
                    </div>
                    <div class="form-group">
                        <label for="dueDate">Due Date</label>
                        <input type="date" id="addition" name="math" @bind-value="@TaskObject.DueDate" />
                    </div>
                    <button type="submit" class="btn btn-primary">Submit</button>
                    <button type="button" class="btn btn-secondary" data-dismiss="modal">Cancel</button>
                </EditForm>
            </div>
        </div>
    </div>
</div>

@code {
    [Parameter]
    public ToDo TaskObject { get; set; }

    List<string> TaskStatusList = new List<string>() { "New", "In Progress", "Completed" };

    private async void HandleValidSubmit()
    {

    }
}
In the above code, we have a form defined using the EditForm component. You can see the EditForm has a model that is passed from the parent component. The properties of the model are bind to the input controls using bind-value. HandleValidSubmit is triggered when the form successfully submits.
I have also declared the TaskDetail Component inside ToDoList component and pass an empty ToDo object. Find below the ToDoList component with changes.
// ToDoList.razor

@page "/todolist"

@using BlazorAppp.Data
@using BlazorAppp.Services
@inject IToDoListService service

<h1>To Do List</h1>

<p>This component demonstrates fetching data from Database.</p>

// Code omitted for brevity

<div>
    <input type="button" data-toggle="modal" data-target="#taskModal" class="btn btn-primary" value="Add Task" @onclick="(() => InitializeTaskObject())" />
</div>

<TaskDetail TaskObject=taskObject></TaskDetail>

@code {
        List<ToDo> toDoList;
        ToDo taskObject = new ToDo();

    protected override async Task OnInitializedAsync()
    {
        toDoList = await service.Get();
    }
    private void InitializeTaskObject()
    {
        taskObject = new ToDo();
        taskObject.DueDate = DateTime.Now;
    }
}
When you click on the “Add New” button, you will see a modal dialog similar to this.
What are the next steps?
- Validate the user input
- Save the data to the database
- Refresh the data in the page to show the new record
Validation
We will use data annotations in the model to validate the user input. I have changed the model to have custom validation messages
// ToDo.cs

public class ToDo
{
    [Key]
    public int Id { get; set; }

    [Required(ErrorMessage = "Task name is required")]
    [StringLength(15, ErrorMessage = "Name is too long.")]
    public string Name { get; set; }

    [Required(ErrorMessage = "Status is required")]
    public string Status { get; set; }

    [Required(ErrorMessage = "Due Date is required")]
    public DateTime DueDate { get; set; }
}
We also need to add DataAnnotationsValidator component which attaches validation support using data annotations. To display the validation messges we use ValidationSummary component. Both the components are added to TaskDetail.razor inside the EditForm component.
// ToDoList.razor

<DataAnnotationsValidator />
<ValidationSummary />
With these changes, if I run the application and try to submit an invalid form, I will get an error screen similar to the one below.
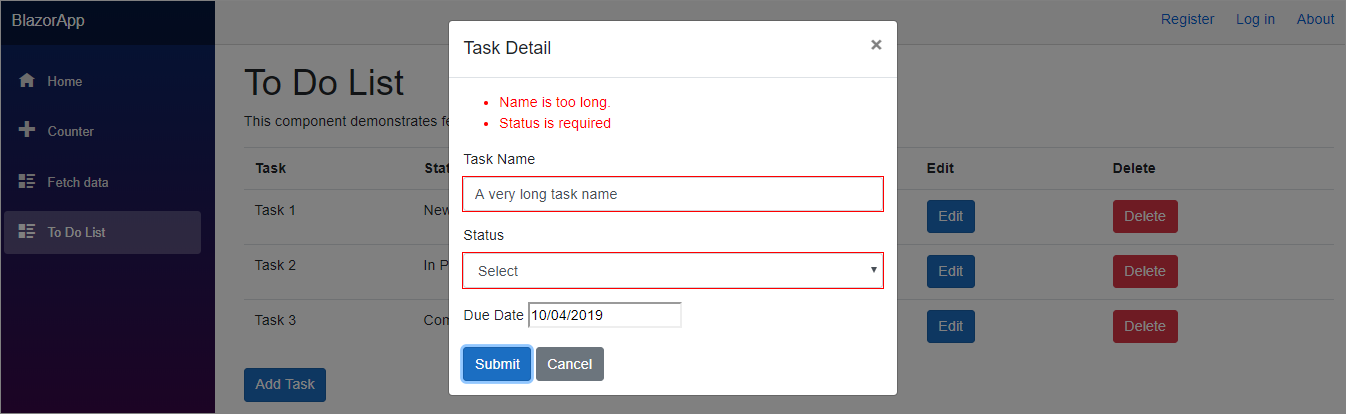
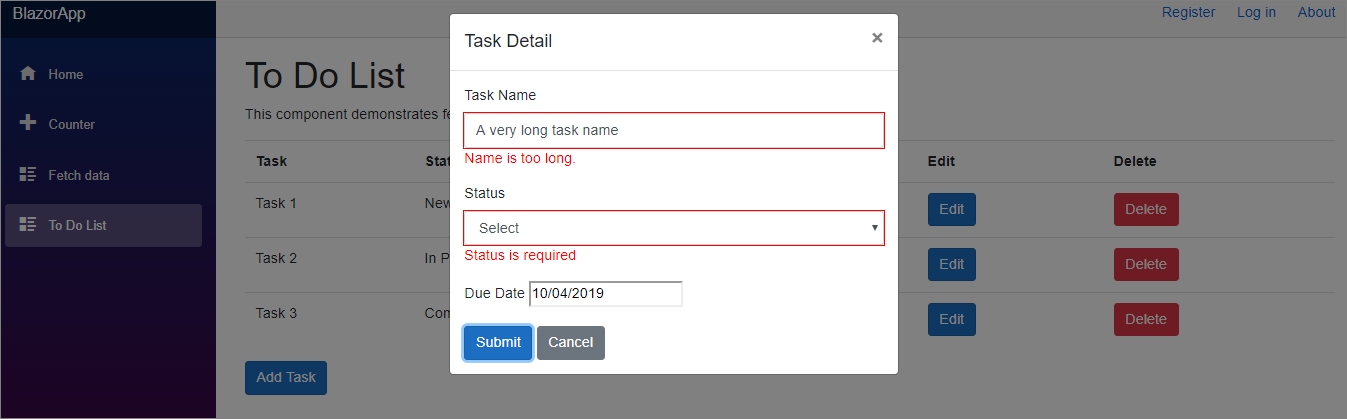
You can see the validation errors in the Validation Summary section. If you want to show the validation message next to each control instead of a summary, remove the ValidationSummary component and have the following pattern of code next to each input element.
// TaskDetail.razor

<ValidationMessage For="@(() => TaskObject.Name)" />
With this, the validation errors will be displayed next to the respective control similar to this.
Save Data
Now we received the data from the user and validated it. Let’s save the data to the database. As I mentioned earlier, HandleValidSubmit is triggered when the form successfully submits after it passes the validation. We have to add the “save” logic in the method.
// TaskDetail.razor

private async void HandleValidSubmit()
{
    await service.Add(TaskObject);
}
JavaScript Interop
The data is saved to the database but the modal dialog is still open. We need to call JavaScript code from .NET code to close the dialog. To call JavaScript function from C#, use the IJSRuntime abstraction. The InvokeAsync<T> method takes an identifier for the JavaScript function that you wish to invoke along with any number of JSON-serializable arguments.
First, we have to create a JavaScript method to close the bootstrap dialog by getting the id of the dialog. The second is to inject the IJSRuntime and lastly use the injected object to issue JavaScript Interop calls. The following JavaScript code is added to the _Host.cshtml.
// _Host.cshtml

<script>
    function ShowModal(modalId) {
        $('#'+modalId).modal('show');
    }
    function CloseModal(modalId) {
        $('#'+modalId).modal('hide');
    }
</script>
After the changes, TaskDetail.razor looks like this
// TaskDetail.razor

@using BlazorAppp.Data
@using BlazorAppp.Services
@inject IToDoListService service
@inject IJSRuntime jsRuntime

// Code omitted for brevity

@code {
    [Parameter]
    public ToDo TaskObject { get; set; }

    List<string> TaskStatusList = new List<string>() { "New", "In Progress", "Completed" };

    private async Task CloseTaskModal()
    {
        await jsRuntime.InvokeAsync<object>("CloseModal", "taskModal");
    }

    private async void HandleValidSubmit()
    {
        await service.Add(TaskObject);
        await CloseTaskModal();
    }
}
Communication Between Components
Now the data is saved and the modal is closed, but I cannot see the newly added item in the grid. I can see the data only if I refresh the browser. I have to tell the parent component to refresh itself to display the new set of data. Components can offer callbacks that parent components can use to react on events raised by their child components. Let’s see how to implement this. I have declared an action DataChanged and invoke it in the HandleValidSubmit method of TaskDetail.razor
// TaskDetail.razor

@code {
    [Parameter]
    public ToDo TaskObject { get; set; }

    [Parameter]
    public Action DataChanged { get; set; }

    List<string> TaskStatusList = new List<string>() { "New", "In Progress", "Completed" };

    private async Task CloseTaskModal()
    {
        await jsRuntime.InvokeAsync<object>("CloseModal", "taskModal");
    }

    private async void HandleValidSubmit()
    {
        await service.Add(TaskObject);
        await CloseTaskModal();
        DataChanged?.Invoke();
    }

}
The parent component ToDoList.razor can handle the DataChanged event like this
// ToDoList.razor

// Code omitted for brevity
<TaskDetail TaskObject=taskObject DataChanged="@DataChanged">

</TaskDetail>

@code {
        List<ToDo> toDoList;
        ToDo taskObject = new ToDo();

    protected override async Task OnInitializedAsync()
    {
        toDoList = await service.Get();
    }
    private void InitializeTaskObject()
    {
        taskObject = new ToDo();
        taskObject.DueDate = DateTime.Now;
    }

    private async void DataChanged()
    {
        toDoList = await service.Get();
        StateHasChanged();
    }
}
With this, we can add a new record after validation, close the dialog upon save and refresh the parent component.
Edit task
Let’s see how to reuse the child component and the ToDoListService to edit an existing record. Okay, what are all the changes we need to make?
First, we need to wire up the “Edit” button to open the child component TaskDetail.razor. It also has to pass the selected task detail to the child component. I have modified the edit button to open the modal and call a method to set the selected object.
// ToDoList.razor

// Code omitted for brevity
<td><input type="button" class="btn btn-primary" @onclick="(() => PrepareForEdit(toDoItem))" data-toggle="modal" data-target="#taskModal" value="Edit" /></td>

// ...

@code {
        List<ToDo> toDoList;
        ToDo taskObject = new ToDo();
//...

    private void PrepareForEdit(ToDo task)
    {
        taskObject = task;
    }
}
The validations we have implemented to add new task will work automatically as we are using the same child component for Edit as well. Once the user modified the data and click save, HandleValidSubmit will be triggered. We have to distinguish between a new record and an existing record to make the appropriate service call. I have used the Id property to differentiate the records.
// TaskDetail.razor

private async void HandleValidSubmit()
{
    if (TaskObject.Id == 0)
    {
        await service.Add(TaskObject);
    }
    else
    {
        await service.Update(TaskObject);
    }
    await CloseTaskModal();
    DataChanged?.Invoke();
}
Render Fragments – Dynamic Content
As of now, there is no difference between Add and Edit dialogs. The captions and the controls in both the dialogues are the same as we are resuing the dialog. The next requirement is to show some visual difference between the dialogs but the reusability of the child component should continue. A render fragment represents a segment of UI to render. We can pass dynamic content within component tag elements and can be rendered in child components using RenderFragment property. Okay, how to achieve that?
First, declare the RenderFragement property in the child component and then substitute the title of the modal dialog with the property.
// TaskDetail.razor

//...
<h5 class="modal-title">@CustomHeader</h5>

//...
@code {
    //..

    [Parameter]
    public RenderFragment CustomHeader { get; set; }

    //..
}
Now in the parent component, we pass the dynamic content within the child component tags. The dynamic content value is set in the add and edit methods. I just pass the inner text as a fragment here, you can pass an HTML element or a nested HTML element.
// ToDoList.razor

//..
<TaskDetail TaskObject=taskObject DataChanged="@DataChanged">
    <CustomHeader>@customHeader</CustomHeader>
</TaskDetail>

@code {
        List<ToDo> toDoList;
        ToDo taskObject = new ToDo();
    string customHeader = string.Empty;

    //..

    private void InitializeTaskObject()
    {
        taskObject = new ToDo();
        taskObject.DueDate = DateTime.Now;
        customHeader = "Add New Task";
    }

    private void PrepareForEdit(ToDo task)
    {
        customHeader = "Edit Task";
        taskObject = task;
    }

    // ..
}
See how the caption of the dialog changed between add and edit dialogs.

Delete Task
We have implemented add and edit functionalities with validation. Let’s start work on delete now. Though we cannot reuse the child component we already created, we can still use the JavaScript Interop. First, we need to wire up the delete button with some event. That event will set the selected task object and pass the information to the child component. Upon confirmation from the child component for delete, we need to delete the record and refresh the task list.
//ToDoList.razor

// Code omitted for brevity
<td><input type="button" class="btn btn-danger" @onclick="(() => PrepareForDelete(toDoItem))" data-toggle="modal" data-target="#confirmDeleteModal" value="Delete" /></td>

//..
<ConfirmDialog OnClick="@Delete" />
<TaskDetail TaskObject=taskObject DataChanged="@DataChanged">
    <CustomHeader>@customHeader</CustomHeader>
</TaskDetail>

@code {
    List<ToDo> toDoList;
    ToDo taskObject = new ToDo();
    string customHeader = string.Empty;

    //..

    private void PrepareForDelete(ToDo task)
    {
        taskObject = task;
    }

    private async Task Delete()
    {
        var task = await service.Delete(taskObject.Id);
        await jsRuntime.InvokeAsync<object>("CloseModal", "confirmDeleteModal");
        toDoList = await service.Get();
        taskObject = new ToDo();
    }
}
Next, we need to create a child component (ConfirmDialog.razor) to get the confirmation from the user on the Delete button click. This is again a bootstrap modal dialog.
<div class="modal" tabindex="-1" role="dialog" id="confirmDeleteModal">
    <div class="modal-dialog" role="document">
        <div class="modal-content">
            <div class="modal-header">
                <h5 class="modal-title">Confirmation</h5>
                <button type="button" class="close" data-dismiss="modal" aria-label="Close">
                    <span aria-hidden="true">×</span>
                </button>
            </div>
            <div class="modal-body">
                <p>Do you want to delete the record?</p>
            </div>
            <div class="modal-footer">
                <button type="button" class="btn btn-primary" @onclick="OnClick">Yes</button>
                <button type="button" class="btn btn-secondary" data-dismiss="modal">Cancel</button>
            </div>
        </div>
    </div>
</div>

@code {
    [Parameter]
    public int Id { get; set; }

    [Parameter]
    public EventCallback<MouseEventArgs> OnClick { get; set; }
}
Summary
This post tried to explain about using Entity Framework Core with Blazor and implement CRUD functionalities. We also discussed the usage of Bootstrap, Validations using Data Annotations and Creation of Dynamic content using RenderFragment.
The full implementation of this post will be available in Github
Recommended Courses
- Blazor: Getting Started
- Creating Blazor Components
- Designing and Building Enterprise Blazor Applications
We may receive a commission for purchases made through these links.
Further reading
The following are some of the links you can refer if you want to learn more about Blazor.


Thank you very much for sharing this article.
that wonderfull thx..
Detailedly amazing insight on Doing CRUD with BLAZOR and EF Core .
Please can you add the capabilities to:
a. sort data in the view,
b. filtering records in the view by typing criteria in a textbox on the view,
c. Paging of the data in the view and
d. Exporting the Data to Excel from the View?
Hi Encarta,
Yes, that’s a great idea. I will add it to my blog post list.
Hello Admin, I m Encarta.
Thank You for accepting to assist with my request above.
Please is there any progress so far?
Awesome!
Thank you very much for the article.
Could you please kindly with many thanks proceed what Encarta suggested.
Hi there Admin,
I wish to appreciate your great two-part article for a basic CRUD application. Thanks very much for the insights into one of the most promising cutting edge technologies presented so nicely.
Can I request you to please add the following to the list of capabilities to be added
1) For preserving data protection for logged in users, only that user-specific data may be shown after logging in (Not all the data to every authenticated user)
Thanks, Kaushik for the comment. I will add this to my list.
Awesome! Thank you very much for the article.
Many Thanx Admin as you work on answering my question posted above. We still hope to hear from you.
Hey Encarta, Added a post for Sorting and Paging.
how should i do this same using procedure ?
Please refer
How to execute Stored Procedure in Entity Framework Core
Thanx Admin for adding the post on Sorting and Paging. You ve provided very clarified insight on these capabilities.
I believe you will add the Filtering capabilities and also add the ability to export the data in the View to Microsoft Excel.
Thanx for your guidance.
Thank you! You helped to understand the basics.
Excellent slides. Me love you long time.
thank you, this is a really great article!
Hello Admin.
Please I hope you you taken note of my comment (as repeated below) after you added the sorting and paging capabilites to you CRUD operations with Blazor.
[[[[[[*******Thanx Admin for adding the post on Sorting and Paging. You ve provided very clarified insight on these capabilities.
I believe you will add the Filtering capabilities and also add the ability to export the data in the View to Microsoft Excel.
Thanx for your guidance.*******]]]]]]]
Thanks for the article, it helped me progress.
If was following your example but I modified it by creating separate pages for Create and Edit. Now I have an issue with passing my existing object to the edit form.
So I’m successfully passing Id of my record when I click it on the list view (@page “/projects/{Id}”), as well as my class instance to use in edit form, but I receive this error: EditForm requires a Model parameter, or an EditContext parameter, but not both.
I use only Model and don’t use EditContext anywhere.
Here is the edit page:
@page “/projects/{Id}”
@inject ProjectDataAccessLayer.IProjectsService service
@inject NavigationManager NavigationManager
Current Project
@code {
[Parameter]
public string Id { get; set; }
Project ProjectInContext;
protected override async void OnParametersSet()
{
ProjectInContext = await service.Get(Int32.Parse(Id));
}
}
Any help appreciated.
Just resolved my own issue – I was navigating to this page with ForceLoad = true in the NavigateTo method. Made it false and it worked!
Thank you for the very useful comment. I would like to add this in case other people have similar issues about dependency injection error. In startup.CS your tutorial only mentioned about adding:
services.AddTransient();
But you will need to make sure to add this as well:
services.AddDbContext(options =>
options.UseSqlServer(
Configuration.GetConnectionString(“DefaultConnection”)));
Thank you for taking the time to write such a simple but functional system.
I decided to learn how to change the [Name] string length from 15 to 25. To do this, I did the following:
1. PM>add-migration
2. Inside Up portion of migration template file added: migrationBuilder.Sql(“ALTER TABLE ToDoList ALTER COLUMN Name nvarchar(25);”);
3. PM>Update-database
4. PMC succeeds
5. Update ToDo.cs data model StringLength from 15 to 25
Excellent Article !
a Must read !!!!!